Resin Bound vs Bonded: What is Difference Which One Should You Choose?
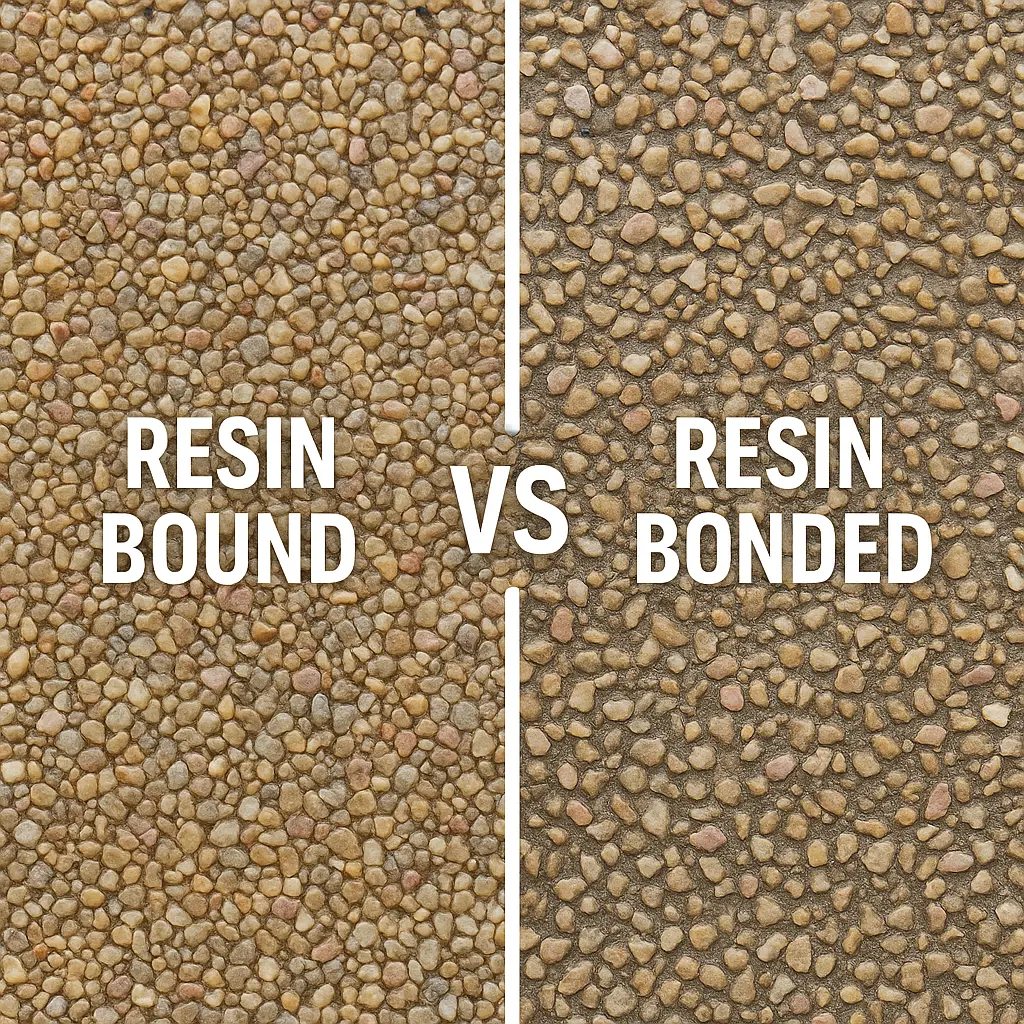
Resin bound and resin bonded systems are two often used choices when considering modern surfacing options. Their structures, installations, drainage systems, and long-term performance differ significantly even if they sound similar. Whether you are building a new driveway, patio or path, knowing the variations will enable you to choose the best resin surface solution for your project. Including installation methods, appearance, maintenance, resin driveway costs, and more, this guide carefully compares resin bound driveways and resin bonded aggregate surfaces. What Is a Resin Bound Surface? Before being troweled onto a prepared base, a resin bound system combines aggregates with a polyurethane resin binding agent. The end effect is a flawless, reasonably priced resin surfacing solution. Characteristics of Resin Bound Surfacing: Completely SuDS-compliant and water-draining permiable paving solution Smooth, frost-resistant resin finish Range of resin bound aggregate sizes and resin color options UV-stable resin systems reduce fading Ideal for resin bound patios, walkways, and driveways This wet pour resin system allows water to drain through a porous resin system, reducing surface water runoff and preventing puddling. It’s ideal for eco-friendly resin options, especially in areas requiring SuDS-compliant driveways. What Is a Resin Bonded Surface? Resin bonded gravel uses a scatter system resin application. A layer of resin is applied to the surface, and dry aggregates are scattered over it. This creates a textured resin finish, offering a natural look similar to loose gravel. Main Features of Resin Bonded Surfacing: Non-permeable resin surface High-grip, anti-slip resin finish Looks like traditional decorative resin surfaces Shorter resin curing time Suitable for slopes or areas requiring extra traction While resin bonded maintenance may be higher over time due to loose stones, it remains popular for its classic appearance and lower upfront cost. This system is ideal for residential resin applications and foot traffic areas. Resin Bound vs Bonded: Key Differences Feature Resin Bound Resin Bonded System Type Bound stone mixture (wet-pour) Bonded gravel system (scatter) Drainage Permeable / SuDS compliant Non-permeable Finish Smooth, seamless Rough, textured Slip Resistance Moderate High (anti-slip) Resin Base Preparation Essential Essential Appearance Modern, polished Natural, gravel-like Maintenance Low Moderate Longevity 15–20 years 8–15 years Installation Skill High – specialist resin bound installation process Moderate SuDS Compliant? Yes No Resin Bound: Pros and Cons Pros: Fully permeable paving solution Smooth, modern finish Resistant to weeds and frost Long lifespan with resin surface warranties Great for commercial resin flooring and high-end homes Cons: Higher initial cost Requires precise resin mixing ratios Longer installation due to resin curing time Resin Bonded: Pros and Cons Pros: Budget-friendly Faster install with rigid resin bonding Excellent grip – great for anti-slip resin finishes Aesthetic of loose gravel without movement Cons: Not a SuDS-compliant surfacing option May require more frequent resin surface repairs Shorter lifespan Cost Comparison and Value Analysis Let’s compare resin bound vs bonded in terms of cost and long-term value: Resin Surface Type Cost per m² Lifespan Value Resin Bound £50–£80 15–20 yrs High (low maintenance, long life) Resin Bonded £25–£50 8–15 yrs Moderate (low install cost, more upkeep) While resin driveway costs vary depending on location, size, and resin base preparation, the resin bound option usually pays off in the long term due to reduced resin surface cleaning and fewer repairs. Which Is Best for Your Project? When deciding between resin bound and bonded, consider: Drainage – Need a porous resin system? Choose resin bound. Budget – Resin bonded is more affordable upfront. Visual appeal – Prefer smooth, polished surfaces? Resin bound wins. Maintenance – Want low upkeep? Bound systems perform better. Application type – Use bonded for slopes; bound for driveways, patios, and paths. Also consider resin surface problems such as cracking or discoloration — most are avoidable with proper installation, base work, and using aliphatic resin systems for UV resistance. Frequently Asked Questions Q1: Are resin bound driveways better than bonded ones? Yes, especially for driveways needing permeability, longevity, and a clean finish. Bound systems also offer flexible resin systems suitable for varied ground conditions. Q2: Can resin bonded surfaces be used for cars? They can, but resin surface longevity is better with bound systems under heavy loads. Q3: Is drainage a concern with bonded resin? Yes. Non-permeable resin surfaces require external drainage. Resin bound surfaces allow water to flow through naturally. Q4: Can I choose different colors and patterns? Absolutely! There’s a wide range of resin surface colors and resin surface patterns available in both systems. Final Thoughts Your particular need will determine whether resin bound or bonded surfaces are best. Perfect for driveways, patios, and high traffic areas, resin bound systems provide exceptional drainage, durability, and beauty. On quick installations, decorative resin surfaces, and places where grip is critical, however, resin bonded surfaces are best. Whatever your decision, a premium resin install begins with professional preparation, appropriate materials, and careful use analysis. Whether your project is commercial resin flooring or a residential resin application, always seek advice from experts knowledgeable in resin surface solutions both inside and outside.
Top Block Paving Patterns to Transform Your Outdoor Space
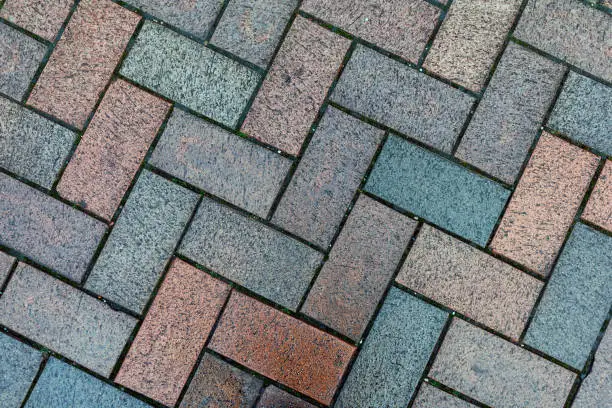
For driveways, patios, garden paths, even commercial outdoor spaces, block paving is among the most dependable and aesthetically pleasing surfacing choices available. Apart from being low maintenance and robust, it provides design flexibility—especially with regard to patterns. The appearance, strength, and performance of the paved area can be greatly changed by the way the blocks are laid. Achieving both utility and curb appeal depends on choosing the correct block paving pattern whether you are redesigning your garden patio or updating your driveway. We investigate the most often used block paving designs in this extensive guide, what distinguishes each one, and how to decide which design fits your project. What Are Block Paving Patterns? Block paving patterns are configurations of block paving (or bricks) laid to produce a hard surface. These trends directly influence the load-bearing capacity of the surface, water drainage, wear resistance, and maintenance ease of use, so transcending mere aesthetics. Block interlocking strength varies depending on the pattern. This is why some designs are more decorative and suited for patios or footpaths while others are better fit for driveways with car traffic. Benefits of Choosing the Right Pattern Enhanced Visual Appeal: The pattern influences the overall look of your outdoor space. Structural Integrity: Some patterns interlock better, offering more strength under pressure. Surface Longevity: Proper patterns reduce shifting, cracking, and weed growth. Easier Repairs: Simple patterns can be easier to lift and repair without major disruptions. Popular Block Paving Patterns (With Pros, Cons & Best Uses) Let’s dive into the most commonly used paving patterns and what makes each one special: 1. Herringbone Pattern (45° and 90°) Description: Bricks are laid at a 45° or 90° angle to create a zigzag effect. The interlocking nature of this pattern gives it superior structural strength. Best for: Driveways, heavy traffic areas, courtyards Advantages: Excellent interlock, reducing movement over time Highly durable under vehicle pressure Classic, stylish appearance Disadvantages: More complex and time-consuming to install Slightly more waste due to cutting edges 2. Basket Weave Pattern Description: Mimics the look of woven fabric by alternating vertical and horizontal pairs of bricks. Offers a vintage, cottage-style look. Best for: Garden paths, patios, older property styles Advantages: Visually warm and traditional Easy to lay and cost-effective Great for foot traffic areas Disadvantages: Less structurally sound for driveways Repetitive appearance on large surfaces 3. Stretcher Bond Pattern (Running Bond) Description: Similar to brick walls, this pattern uses offset rows where each block overlaps half of the one below it. Best for: Modern patios, pathways, small driveways Advantages: Simple, clean aesthetic Easy and fast installation Works well with rectangular blocks Disadvantages: Offers less resistance to shifting under heavy loads Can look plain on large surfaces 4. Circular Pattern Description: Pavers are arranged in a circular design, usually with a central focal point and expanding rings. Can be used on its own or combined with other patterns. Best for: Statement driveways, patios with features like fountains or fire pits Advantages: Decorative and eye-catching Great for custom design projects Disadvantages: Requires precision and block cutting Best installed by professionals 5. Fan Pattern Description: Originating from Europe, this pattern creates a fan-shaped curve using specially cut blocks. Offers an elegant, cobbled-street feel. Best for: Large patios, garden paths, traditional or period-style homes Advantages: Classic European aesthetic Stands out with high visual interest Disadvantages: Requires advanced skills to install Often higher in cost due to cutting and layout time 6. Random Course Pattern Description: Blocks of various sizes are laid in a seemingly random fashion. Gives a natural and informal appearance. Best for: Rustic garden paths, informal patios, countryside homes Advantages: Natural, less uniform appearance Blends well with landscaping Disadvantages: Can be tricky to plan Requires careful block selection to avoid gaps How to Choose the Right Block Paving Pattern When selecting a pattern, consider the following: Purpose of the Surface: Will it be walked on or driven over? Design Style: Traditional vs. modern, rustic vs. clean lines Maintenance Needs: Simpler patterns are often easier to clean and repair Installation Costs: More complex patterns take longer and may cost more Visual Flow: Some patterns make areas look bigger or more structured Mixing and Matching Patterns Want a one-of-a-kind look? Many homeowners are now combining two or more paving patterns to highlight certain areas. For example: Use a circular pattern at the centre of a driveway, with a herringbone layout surrounding it. Add contrasting borders using stretcher bond to define the edges. Maintenance Tips for Block Paving Even the best-laid pattern needs care. Here are a few tips: Seal the Surface: Protects against stains, moss, and water penetration. Re-sand the Joints: Helps maintain interlock and reduce weed growth. Clean Regularly: Power washing keeps it looking fresh. Watch for Shifting: Especially in high-traffic areas; repair promptly. DIY vs. Professional Installation While DIY block paving is possible for simple patterns, professional installation is highly recommended for complex designs like fan or circular layouts. Proper ground preparation, drainage, and alignment are crucial to long-lasting results. Benefits of hiring a pro Correct foundation work Precision cuts and layout Faster project turnaround Fewer future repairs Final Thoughts Selecting a block paving pattern is an investment in the lifetime and appearance of your property, not only a design choice. There are countless choices whether your taste is for the strength of a herringbone pattern or the classic elegance of a basket weave. Plan your layout carefully, take functional needs into account, and seek a reputable paving professional to realize your vision for best results.
How to Clean Resin Driveway
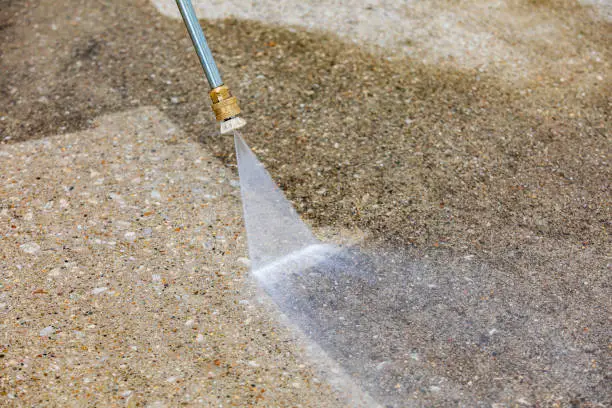
How to Clean a Resin Driveway: A Comprehensive Guide for Homeowners A resin driveway provides a low-maintenance, long-lasting, and fashionable surface; however, frequent cleaning is necessary to maintain its best appearance and functionality. Knowing the proper cleaning methods can make a big difference, regardless of whether you want to do it yourself or are thinking about hiring a professional. We’ll take you through professional techniques in this guide to clean your resin driveway, remove stubborn stains, stop organic growth, and choose between do-it-yourself and professional care. Why Is Your Resin Driveway Needing Cleaning? The look of your resin-bound surface can be eroded over time by debris, oil stains, moss, algae, and even bird droppings. In addition to improving curb appeal, routine resin driveway cleaning also guards against damage and prolongs the life of your investment. Maintaining your resin-bound surface also helps to prevent long-term discolouration, support appropriate drainage, and keep it permeable. More severe problems like erosion, weed growth, and decreased UV protection can result from neglecting maintenance. The Equipment and Supplies You’ll Need Prior to starting, make sure you have the necessary tools and use cleaning solutions that are safe for resin. To complete the task safely, you’ll need a stiff nylon brush, warm water, a pressure washer with adjustable settings, a soft-bristled broom, and a pH-neutral cleaner. Steer clear of bleach and harsh chemicals as they can harm the surface or lessen its efficacy. The best way to minimise damage to neighbouring grass or garden beds while still getting good results is with environmentally friendly resin driveway cleaners. How to Clean Resin Driveway Correctly, Step-by-Step Get rid of any loose debris Begin by giving your driveway a thorough sweep. Eliminating dust, leaves, and sticks stops accumulation that can cause moss or algae to grow. One of the easiest and most efficient ways to clean a resin driveway is to sweep it frequently. Remove Stains Spotlessly For stubborn spots, use warm soapy water or a mild degreasing solution. Oil stains on resin driveways can be removed by applying the solution directly to the affected area, letting it sit for a few minutes, and then cleaning with a non-metallic brush. pH-neutral stain removers can be used to address other common problems like rust marks or discolouration of resin driveways. It usually works to gently scrape and then brush away chewing gum or tyre marks. Gently Rinse Rinse the whole surface with a garden hose or a soft wash system. Any last bits of loose dirt or cleaning solution are eliminated in this step. Use low-water techniques or biodegradable cleaners that need little rinsing when there are drought restrictions in place. Pressure Washing (If Required) Resin surfaces can be successfully pressure washed, but care must be taken. To protect the resin, turn your washer on to low pressure and keep the nozzle a safe distance away. Excessive force used when power washing resin-bound surfaces can cause erosion or weaken the structure. Handling Difficult Stains: Spills of Oil, Grease, and Chemicals Whether it’s an unintentional chemical spill or a leaky automobile, accidents happen. These situations are best served by degreasing solutions designed especially for cleaning permeable driveways. Always take immediate action to clean up chemical spills on resin driveways. Use a cloth or absorbent pad to absorb as much liquid as you can, and then use a gentle, non-corrosive cleaner to get rid of any leftover residue. If the stains are extensive or deep, professional resin driveway cleaning services are advised. Eliminating Organic Growth: Weeds, Moss, and Algae In addition to being unsightly, organic growth can cause your driveway to become dangerously slick. Make use of products made to remove moss from resin driveways and stop algae from growing on resin surfaces. Usually, these solutions are brushed on, allowed to soak, and then rinsed off. Weeds can be pulled by hand or treated with a resin-safe herbicide to get rid of growth between resin joints. Maintaining a dry, clean surface and performing routine maintenance are key to preventing moss regrowth on resin. The Dos and Don’ts of Pressure Washing Resin Driveways If done correctly, pressure washing can be an excellent way to thoroughly clean resin-bound aggregate. Do: Use gentle pressure and keep the nozzle moving Follow manufacturer-recommended pressure washer settings for resin surfaces Use soft water if available to avoid mineral buildup Don’t: Use a turbo or rotary nozzle Stand too close to the surface Use hot water or bleach-based cleaners For permeable surfaces, mild cleaning techniques help preserve structural integrity and preserve the surface’s original appearance. Choosing Between Professional and Do-It-Yourself Cleaning For routine maintenance and minor stains, do-it-yourself resin driveway cleaning solutions are excellent. With the appropriate equipment, they can be completed in a few hours and are reasonably priced. However, when it comes to persistent discolouration, embedded stains, or the need for sealing, professional cleaning is frequently the better option. An examination of possible concerns, such as drainage issues or cracks that might impair performance, is another aspect of professional services. To restore your surface without causing damage or to install resin driveways, Advance Driveway Solutions uses eco-friendly cleaning solutions and state-of-the-art resin driveway cleaning equipment. Tips for Seasonal Resin Driveway Maintenance The needs of your driveway will vary with the seasons: Spring/Summer: Pay special attention to cleaning up leaf stains, bird droppings, and UV-protective surface sealing. Autumn: Remove fallen leaves to avoid moss growth and discolouration. Winter: Steer clear of rock salt and corrosive chemicals, and use safe ice removal for resin driveways. All year long: Clean, inspect, and, if desired, seal resin driveways according to the recommended annual maintenance schedule. Restoration & Protection of Resin Driveways Cleaning isn’t always enough. After cleaning, resin driveway repair might be necessary if your driveway exhibits wear. Patching cracks, resealing, and restoring faded colour are all examples of this. After cleaning, think about applying a protective coating to prolong the life of your driveway. After cleaning, resin driveway sealing adds another line of
How to Secure Trellis to Fence
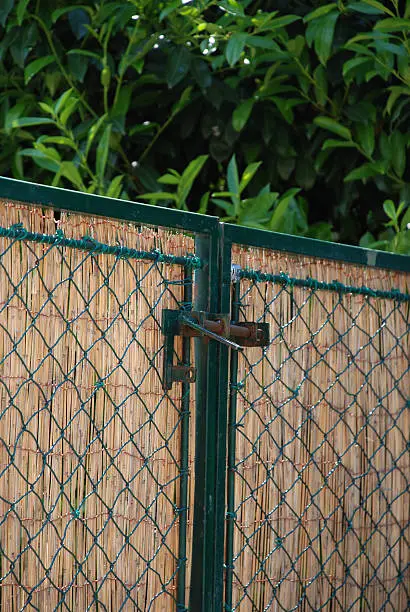
How to Secure Trellis to Fence: A Complete DIY & Expert Guide by Advanced Driveway Solutions Trellises are more than just garden accessories — they transform flat fences into vertical gardens, support plant growth, and enhance privacy. Whether you’re cultivating fragrant jasmine, vibrant clematis, or climbing vegetables, learning how to secure trellis to fence ensures a long-lasting, stable, and aesthetically pleasing result. At Advanced Driveway Solutions, we believe great landscaping begins with the right support systems — literally. This comprehensive guide covers everything from essential tools to installation techniques for wood, vinyl, and chain-link fences, so you can find the ideal method to fit your garden’s needs. Why Add a Trellis to Your Fence? Before getting into tools and techniques, it’s worth understanding why fence-mounted plant supports have become a must-have: Visual Appeal: Trellises break the monotony of plain fences and bring life to dull spaces with ornamental vine support. Vertical Gardening: Ideal for small spaces, trellises let you grow upwards, maximizing space with climbing plant support structures and vertical gardening supports. Privacy and Shade: When paired with lush greenery, they provide natural privacy barriers — perfect for creating privacy fence trellis combinations. Plant Health: They promote airflow and reduce ground contact, helping prevent disease and encouraging growth. Customization: Trellises come in various styles including modular trellis systems, lattice panel attachment, and even garden fence extensions. Essential Tools and Materials for Securing Trellises Depending on the type of fence and trellis, your tools may vary. Here’s a comprehensive list: Tools for securing trellises: Power drill or manual screwdriver Hammer (for anchors or nails) Level (to ensure alignment) Measuring tape Marker/pencil Safety gloves and goggles Materials for securing trellises: Fence trellis brackets, U-bolts, or clamp-on trellis attachments Zip ties for trellis attachment or cable ties for garden structures Screws/bolts made of stainless hardware for garden structures Trellis wire system or tension wire systems for plants Construction adhesives or outdoor adhesives for garden structures Weatherproof sealants and rust protectants Different Ways to Secure Trellis to Fence 1. Using Zip Ties for Quick and Non-Destructive Installation There’s no one-size-fits-all method. Your approach should consider fence material, trellis weight, plant type, and whether the solution needs to be permanent or temporary. Looking for non-destructive trellis attachment? Zip ties offer a fast and simple method, ideal for renters or temporary seasonal gardens. Steps: Position your trellis against the fence. Loop zip ties or cable ties for garden structures through the trellis and around fence posts or panels. Tighten the ties and cut off the excess. Space ties evenly for balanced weight distribution. Best for: Chain link fence trellis attachment Lightweight trellises Temporary gardens or changing plant layouts Removable trellis mounts for flexibility Pros: No tools required, adjustable, won’t damage your fence Cons: Limited support for heavy plants or harsh weather 2. Installing Brackets and Mounting Hardware This is the most secure and long-lasting option, particularly for wooden fences or heavier trellis structures. Steps: Mark the bracket points evenly on the fence. Pre-drill holes to prevent wood splitting. Attach fence trellis brackets or U-bolts for trellis installation using stainless screws. Mount the trellis onto the brackets securely. Best for: Heavy-duty trellis hardware Metal trellis to wood fence Long-term installations Decorative trellis mounting Pros: Extremely durable and weather-resista Cons: Requires drilling, not ideal for vinyl 3. Wire and Tension Systems for Flexible Support Great for supporting espaliered plants or setting up a modular garden. Steps: Install eye hooks or anchor bolts at multiple heights. Thread galvanized wire through each anchor point. Tension the wire evenly to avoid sagging. Attach the trellis or directly train plants onto the wire. Best for: Trellis support systems Flexible and adjustable setups Vertical garden weight distribution Pros: Customizable and scalable Cons: Requires periodic tension checks and more setup time 4. Construction Adhesives and Specialized Outdoor Glues Wondering how to attach trellis to vinyl fence without drilling? Heavy-duty adhesives are the answer. Steps: Clean both the trellis and fence surfaces. Apply construction adhesive generously along contact points. Press the trellis firmly onto the fence. Use temporary clamps or ties while the adhesive cures. Best for: Vinyl or composite fences No-drill trellis solutions Small, decorative trellises Pros: Maintains fence integrity Cons: Not suitable for heavy loads or moisture-prone areas Special Considerations for Different Fence Types Fence Type Best Attachment Method Notes Wood Fence Brackets, U-bolts, Screws Secure and durable Vinyl Fence Adhesive, Zip Ties Avoid drilling; use non-invasive methods Chain Link Fence Zip Ties, Wire Systems Easy to attach without tools Brick/Concrete Drill + Plugs, Adhesives May require masonry drill bits Avoid These Common Mistakes Overloading the trellis without considering the weight capacity of trellis fasteners Using indoor adhesives or rust-prone materials Blocking airflow by skipping proper trellis spacing from fence Forgetting to factor in seasonal trellis maintenance for growing cycles Choosing weak hardware for growing vegetables on fence trellis Maintenance and Reinforcement Tips Inspect for rust, rot, or loose fittings quarterly Apply sealants to wood annually Upgrade with expanding trellis systems as plants grow Add supports when installing vertical garden weight distribution systems Clean and retie zip ties annually for durability Final Thoughts Learning how to secure trellis to fence opens up a whole new world for gardeners and home improvers. With the right tools, thoughtful planning, and the support of fencing pros like Advanced Driveway Solutions, your trellis will not only stand strong — it will flourish. FAQs Q: Can I install a trellis without drilling? Yes, opt for no-drill trellis solutions such as zip ties or outdoor adhesives, ideal for vinyl and chain-link fences. Q: How do I know if my fence can support a heavy trellis? Check the weight capacity of trellis fasteners and consider trellis reinforcement techniques if needed. For weak or aging fences, reinforcement or post additions may be necessary. Q: What’s the best way to secure a trellis for
How to Stop Weeds in Block Paving

How to Stop Weeds in Block Paving: Expert Tips from Advance Driveway Solutions Block paving brings style, durability, and curb appeal to your home’s exterior—but nothing spoils its neat appearance quite like weeds creeping through the joints. These unwanted guests can quickly turn a beautiful driveway or patio into a maintenance nightmare. At Advance Driveway Solutions, we specialize in helping homeowners restore and protect their paving from common issues like weed growth. In this detailed guide, you’ll learn why weeds grow in block paving, how to remove them effectively, and—most importantly—how to prevent them from coming back. Why Do Weeds Grow in Block Paving? Contrary to popular belief, most weeds don’t grow up from underneath your block paving—they grow from above, when seeds settle and germinate in the gaps between blocks. Common Causes of Weed Growth in Block Paving: Wind-blown Seeds: Weeds such as dandelions, chickweed, and moss often arrive via wind and settle into the tiny cracks in your paving. Organic Build-up: Dirt, dust, fallen leaves, and bird droppings collect in the joints over time, creating a fertile bed for weed seeds. Moisture & Poor Drainage: Damp environments are ideal for weed growth. Block paving areas with poor drainage or shaded spots are especially vulnerable. Lack of Maintenance: If block paving isn’t regularly cleaned or resealed, the gaps between blocks can become breeding grounds for weeds, moss, and algae. How to Stop Weeds in Block Paving: Proven Methods The best way to stop weeds in block paving is to prevent them from taking root in the first place. Here’s how: 1. Preventive Maintenance: The First Line of Defense The best way to stop weeds in block paving is to prevent them from taking root in the first place. Here’s how: Regular Sweeping Sweep your paving at least once a week. Use a stiff-bristled broom to remove dust, leaves, and seeds. This reduces organic material buildup and prevents seeds from settling. Power Washing (Jet Washing) Power wash your paving every 6–12 months. High-pressure water lifts out dirt, moss, and early weed growth from joints. Be cautious not to disturb the sand between the blocks—resanding may be needed after washing. Edge Control Trim grass, plants, and hedges that grow near your block paving. Weeds often start at the edges and migrate inward. 2. Weed Removal Techniques: Get Rid of What’s Already There If you’re already seeing weeds, don’t worry. Here are safe and effective removal techniques: Manual Weed Removal Use a weeding knife or block paving scraper to extract weeds from the roots. Ideal for light infestations or eco-conscious homeowners. Best done after a rain when the ground is soft. Natural Weed Killers Boiling Water: A simple and effective method—just pour directly on the weed. White Vinegar Spray: Mix 1 part vinegar with 1 part water, add a few drops of dish soap, and spray. These methods are non-toxic and great for households with pets or children. Chemical Weed Killers (Herbicides) Use a glyphosate-based product for stubborn or widespread infestations. Apply in dry weather when no rain is expected for 24 hours. Be cautious around plants and follow all safety instructions. 3. Block the Growth: Long-Term Weed Prevention Short-term fixes are great, but to truly stop weeds in block paving, you need to block their access and growth. Use of Polymeric Sand Unlike regular kiln-dried sand, polymeric sand contains binders that harden when wet. Once installed, it creates a solid seal that blocks weed seeds and insects from penetrating the joints. Great for patios, driveways, and paths with heavy foot or vehicle traffic. Seal Your Block Paving Paving sealers are liquid solutions applied to the surface and joints of the paving. They create a protective barrier that: Prevents weed seeds from settling. Reduces water penetration. Enhances color and extends the life of the paving. Reapply every 2–3 years for best results. Professional Help: When to Call Advance Driveway Solutions DIY methods are great, but if you’re facing persistent weed problems or a large, neglected driveway, calling in professionals can save you time, effort, and money in the long run. Our Block Paving Weed-Control Services Include: Pressure Cleaning: Deep cleans your paving, removing moss, algae, dirt, and existing weeds. Re-Sanding & Joint Repair: We replace old, loose jointing sand with polymeric sand or kiln-dried sand. Sealing Services: We apply high-quality sealants to lock out moisture and prevent further weed growth. Paving Repairs: We lift and relay sunken or uneven blocks that may be harboring weed roots underneath. With years of experience and a team dedicated to detail, Advance Driveway Solutions offers reliable, long-term protection for your block paving. Bonus Tips to Keep Your Block Paving Weed-Free Here are some pro tips from our experts to maintain a weed-resistant paving surface all year round: Clean up organic debris (leaves, soil, moss) promptly. Fix drainage problems to prevent standing water. Avoid overwatering plants or lawns near the paving. Install edging or barriers to limit grass creep. Schedule professional resealing every few years. Conclusion Weeds are not just unsightly—they can cause structural damage, trap moisture, and shorten the lifespan of your block paving. The good news is, with the right mix of regular maintenance, weed prevention techniques, and professional sealing services, you can keep your driveway or patio looking pristine. At Advance Driveway Solutions, we’re committed to helping you enjoy a clean, weed-free outdoor space with minimal upkeep. Get in touch with our team today for a free quote or consultation—we’re here to help! FAQs: Stopping Weeds in Block Paving Q1: Will sealing block paving stop weeds permanently? Sealing significantly reduces weed growth but may not completely eliminate it. It forms a barrier against moisture and seed germination—when combined with good maintenance, it offers near-complete protection. Q2: Can weeds grow through polymeric sand? Very rarely. Polymeric sand creates a tough joint that resists weed penetration. It’s far more effective than traditional jointing sand. Q3: How often should I reseal my block paving? Every 2–3 years, depending on usage, weather conditions, and
How to Clean Artificial Grass
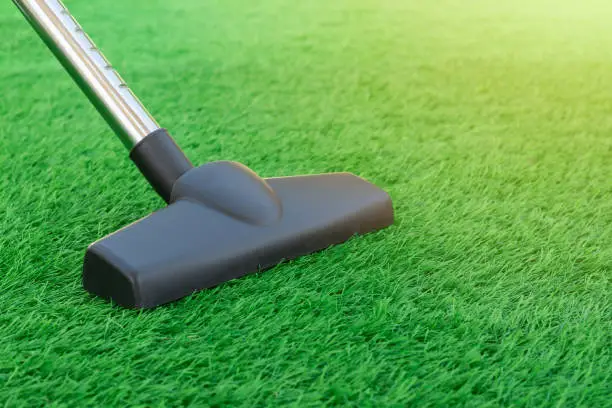
How to Clean Artificial Grass: Easy Maintenance Tips for a Fresh-Looking Lawn Artificial grass has become a go-to choice for homeowners looking to enjoy a lush, green lawn without the hassle of constant mowing, watering, or weeding. But while it’s much easier to maintain than natural grass, it still needs regular cleaning to keep it looking its best. In this blog, we’ll walk you through how to clean artificial grass effectively, the tools you’ll need, common mistakes to avoid, and when to call in the professionals. And if you’re considering switching to artificial turf, Advance Driveway Solutions also offers expert artificial grass installation tailored to your needs. Why Cleaning Artificial Grass Matters Just like any outdoor surface, artificial grass can collect dust, leaves, pet hair, and other debris over time. Regular cleaning helps: Prevent odors from pet waste or bacteria buildup Maintain the bright, green appearance Extend the lifespan of your turf Keep your lawn safe and hygienic for children and pets Neglecting maintenance can cause the grass to flatten and become dull, especially in high-traffic areas. How Often Should You Clean Artificial Grass? The frequency of cleaning depends on how often the area is used: Light use: Brush and rinse once every 2–4 weeks Heavy use or pets: Spot clean weekly, deep clean monthly After storms or seasonal change: Do a thorough clean to remove debris Consistency is key to keeping your lawn fresh all year long. Tools You’ll Need for Cleaning No need for any fancy equipment—just some simple tools you probably already have: Garden hose or watering can Soft-bristle broom or stiff brush Leaf blower or plastic rake Mild detergent or dish soap Enzyme cleaner (for pet owners) Turf-safe deodoriser (optional) Avoid using metal rakes or harsh chemicals, as they can damage the turf. Step-by-Step Guide: How to Clean Artificial Grass 1. Remove Loose Debris Start by clearing leaves, twigs, and rubbish using a plastic rake, leaf blower, or broom. This prevents buildup and helps with water drainage. 2. Rinse the Surface Use a garden hose to rinse away dust and pollen. Start at one end and work your way across the lawn in sections. 3. Brush the Grass Use a stiff broom or turf brush to lift flattened blades and restore the natural look. Brush against the grain for best results. 4. Tackle Stains and Spills Mix mild dish soap with warm water and use a sponge or cloth to scrub the stained area. For tougher spots (like sticky food or drink), let the solution sit for a few minutes before wiping. 5. Clean Pet Waste Remove solid waste as soon as possible. Rinse the area and apply an enzyme-based cleaner to eliminate bacteria and odor. 6. Apply Deodoriser (Optional) If you have pets or your turf gets a lot of foot traffic, consider using a turf-safe deodoriser spray to keep it smelling fresh. Common Mistakes to Avoid Using bleach or harsh chemicals – they can discolor or weaken the grass. Pressure washing too close – may damage the turf backing. Letting leaves pile up – can trap moisture and lead to mold or weed growth. Skipping the brushing – flattened grass blades look worn and unnatural. Seasonal Maintenance Tips Spring & Summer: Rinse more often due to increased pollen and dust. Clean up after outdoor BBQs or garden parties. Autumn: Stay on top of leaf fall to prevent buildup. Winter: Avoid using salt or ice melt; it can damage the turf base. Sweep away snow instead of shoveling deeply. When You Need to Install New Artificial Grass No matter how well you care for your turf, there comes a time when replacement is necessary. Look out for these signs: Worn or matted turf that doesn’t bounce back after brushing Foul odors that persist even after cleaning Visible damage like holes, tears, or lifting seams Outdated turf appearance or discolouration from UV exposure Poor drainage or standing water after rainfall “If your artificial grass looks tired, damaged, or doesn’t perform like it used to, it may be time for a fresh start.” At Advance Driveway Solutions, we offer professional artificial grass installation services, ensuring your new lawn looks stunning and lasts for years. From ground preparation to final brushing, we handle it all—leaving you with a seamless, natural-looking finish. Professional Cleaning Services for Artificial Grass While DIY cleaning is great for regular upkeep, sometimes your turf needs a deeper clean—especially after heavy use or seasonal changes. Our team at Advance Driveway Solutions offers professional artificial grass cleaning services to keep your lawn looking pristine all year round. We use specialized equipment and safe products to: Remove stubborn stains Fluff and lift grass fibers Eliminate odors and bacteria Restore the fresh, vibrant look of your turf Conclusion Cleaning artificial grass doesn’t have to be a chore. With the right tools and a simple routine, your lawn can stay beautiful, fresh-smelling, and ready to enjoy year-round. And remember—whether you need a professional cleaning service or want to install artificial turf for the first time, Advance Driveway Solutions is here to help. Ready to transform your outdoor space? 👉 Contact us today for a free quote or to learn more about our artificial grass services.
How To Clean Block Paving
How to Clean Block Paving Like a Pro – Expert Tips from Advanced Driveway Solutions Block paving is one of the most popular choices for driveways, patios, and garden paths in the UK. It’s stylish, durable, and can significantly improve your home’s kerb appeal. However, like any outdoor surface, block paving requires regular maintenance to keep it looking fresh and performing well. If you’re wondering how to clean block paving properly—whether it’s covered in weeds, stained by oil, or dulled by moss and grime—you’ve come to the right place. At Advanced Driveway Solutions, we specialise in everything from block paving installation to professional cleaning and sealing. In this guide, we’ll take you through a step-by-step method to clean your block paving and keep it looking brand-new for years. Why Cleaning Block Paving is Important Cleaning block paving isn’t just about aesthetics—it’s also about preserving its structure and extending its lifespan. Over time, your paving can accumulate dirt, oil, moss, algae, weeds, and other organic matter that not only looks unsightly but can also cause long-term damage. Here are some key reasons why regular cleaning is essential: Prevents Weed Growth Weeds and moss can grow between the joints of your block paving. If left unchecked, roots can push blocks out of place and cause structural problems. Improves Safety Slippery algae, moss, and built-up grime can create hazardous walking conditions, especially in wet or icy weather. Maintains Kerb Appeal A clean driveway gives your home a polished look. It’s especially important if you’re selling your property or hosting guests. Enhances Longevity Dirt and moisture can erode jointing sand over time. Cleaning your paving and replacing the sand helps maintain stability and prevent sinking. Tools and Materials You’ll Need To clean block paving effectively, gather the following materials: Broom or stiff brush Pressure washer (or hose and scrubbing brush if you prefer a manual method) Weed killer or white vinegar (natural alternative) Block paving cleaning solution or mild detergent Kiln-dried sand for re-jointing Sealant (optional but highly recommended for long-term protection) Step-by-Step Guide: How to Clean Block Paving Here’s a complete guide on how to clean your block paving the right way: Step 1: Clear Loose Debris Start by sweeping away leaves, dirt, and surface-level debris with a stiff broom. This will expose areas with moss, weeds, or stains. Step 2: Remove Weeds and Moss Apply a weed killer across the joints. For eco-friendly cleaning, white vinegar or boiling water can be used to kill weeds and moss. Let it sit for 24–48 hours for maximum effectiveness. Step 3: Apply Cleaning Solution (Optional) If your paving is heavily soiled or stained, apply a dedicated block paving cleaner. Use a soft brush to scrub the solution in, allowing it to break down oil, grease, or organic stains. Step 4: Pressure Wash A pressure washer is one of the most effective ways to clean block paving. Start from one edge and work methodically across the surface. Tip: Use a fan nozzle to avoid dislodging the sand between the joints. Keep the nozzle at a 45° angle and a safe distance (around 20–30cm) from the surface. ⚠️ Avoid using too much pressure on older or damaged paving—it may loosen or crack the blocks. Step 5: Allow to Dry Completely Once washed, allow your block paving to dry thoroughly. This is important before moving on to the next step. Step 6: Re-Sand the Joints Once the paving is dry, sweep kiln-dried sand into the joints. This locks the blocks in place and prevents weed growth. Focus on filling every joint completely. Use a broom and sweep at different angles to make sure the sand settles evenly. Step 7: Seal the Surface (Optional) Applying a block paving sealant is a great way to protect your paving from stains, moisture, and weed regrowth. It also gives your paving a rich finish and enhances the colour. Common Mistakes to Avoid Here are some mistakes people often make when cleaning block paving: Using excessive pressure: This can remove too much jointing sand and damage blocks. Not re-sanding after cleaning: Leaving joints empty makes them vulnerable to weed growth and water erosion. Skipping weed treatment: Pressure washing alone won’t kill deep-rooted weeds—chemical treatment is necessary. Sealing too soon: Sealing before the paving is fully dry can trap moisture, leading to staining and mildew. How Often Should You Clean Block Paving? We recommend cleaning your block paving at least once or twice a year—ideally in the spring and autumn. However, if you notice: Water pooling on the surface Weeds growing rapidly Oil or rust stains Fading or general grime build-up …it’s time for a deep clean. When to Consider Installing New Block Paving Sometimes, even the most thorough clean can’t bring damaged paving back to life. Here are signs it might be time to replace it: Sunken or uneven blocks causing water drainage issues Cracked or chipped paving stones Persistent stains that can’t be removed Mismatched colours or outdated designs Loose blocks or compromised structure If you’re facing any of these issues, it might be more cost-effective to install new paving rather than continue repairing the old one. At Advanced Driveway Solutions, we provide professional block paving installation for driveways, patios, and garden paths. Whether you’re renovating your property or need to replace a worn-out driveway, our expert team delivers durable, stylish results that last. When to Call the Professionals There’s nothing wrong with a DIY approach—but for more extensive issues, a professional cleaning service is often the best option. You should call in the pros if: Your block paving has heavy moss or algae growth You need oil, rust, or paint stains removed The surface is uneven, unstable, or damaged You’re short on time and want fast, professional results At Advanced Driveway Solutions, we provide: Block paving cleaning and re-sanding Block paving sealing Full block paving installation and repair We use commercial-grade equipment and materials to ensure a long-lasting, high-quality finish. Final Thoughts Knowing how to clean block
Eco-friendly Block Paving Solutions for 2023

As urban landscapes rapidly evolve, the quest for sustainable building solutions has never been more pressing. One area witnessing a green revolution is the world of paving. Traditionally, paving has been associated with materials and processes that can strain the environment. However, 2023 heralds a transformative era for eco-conscious homeowners and urban developers. Today, block paving is not just about aesthetic appeal or durability; it’s about making responsible choices for the planet. With rising concerns over climate change and the pressing need for sustainable urban drainage systems, eco-friendly block paving has transitioned from a niche interest to an industry standard. Whether you’re planning a new driveway, revitalising public spaces, or just keen to stay abreast of the latest green construction trends, the eco-friendly block paving solutions emerging this year are both innovative and inspiring. Dive with us into the world of sustainable paving and discover how the blocks you choose can leave a lasting, positive impact on the environment. The Importance of Environmental Sustainability Our planet is at a crucial juncture. The devastating effects of climate change, deforestation, pollution, and overconsumption are evident in every corner of the world. From shrinking glaciers and rising sea levels to loss of biodiversity and extreme weather events, the signs are clear: human actions have accelerated environmental degradation. Why Sustainable Alternatives Matter Enter sustainable alternatives – these are not just trendy buzzwords but essential lifelines for our planet’s future. By adopting eco-friendly practices and materials, we are reducing the harm inflicted on the environment and actively contributing to its recovery. Sustainable solutions go beyond just addressing the symptoms; they target the root causes of environmental problems. For instance, shifting from fossil fuels to renewable energy sources directly combats the rise in harmful greenhouse gases. Similarly, opting for sustainable agriculture over industrial farming protects our soil and water resources. A Ripple Effect of Change One of the most remarkable aspects of sustainable alternatives is the ripple effect they create. When one industry or individual adopts eco-friendly practices, it often inspires and influences others to do the same. This collective shift in mindset and action can lead to significant positive changes on a global scale. The Path Forward Embracing sustainable alternatives is not a choice but a necessity. If we hope to leave behind a thriving, healthy planet for future generations, prioritising sustainability in our daily decisions, industries, and governance is paramount. The road to recovery may be long, but with sustainable practices at its core, it’s a journey worth embarking on. Benefits of Eco-friendly Block Paving 1. Enhanced Stormwater Management Eco-friendly block paving often features permeable designs. This means that water can seep through the gaps and be absorbed into the ground during rainfall, reducing the risk of flooding and preventing water pooling. It aids in replenishing groundwater and mitigating the heat island effect in urban areas. 2. Durability and Longevity Green block paving solutions, like those made from recycled materials or specially formulated porous concrete, often have extended lifespans. They are designed to be robust, resilient to wear and tear and require fewer replacements over time. This means reduced resource consumption and waste generation in the long run. 3. Lower Carbon Footprint Eco-friendly block paving materials are typically manufactured using processes that emit fewer greenhouse gases compared to traditional methods. Moreover, using recycled or sustainably sourced materials ensures minimal energy consumption and waste. 4. Improved Air and Water Quality Permeable block paving systems can filter, trapping pollutants and preventing them from entering waterways. This helps maintain cleaner rivers and oceans. Plus, with the reduced heat island effect, there’s lower demand for air conditioning, leading to reduced energy consumption and fewer emissions. 5. Biodiversity Boost Specific eco-friendly paving options, like grass or turf pavers, incorporate greenery. This adds aesthetic appeal and provides habitats for micro-organisms and supports local flora, enhancing biodiversity in urban areas. 6. Economic Savings While the initial cost of eco-friendly block paving might be higher, the long-term savings are notable. Reduced maintenance, longer lifespan, and potential savings from stormwater management infrastructure can result in overall cost benefits. 7. Ethical and Aesthetic Appeal Using environmentally-friendly materials and solutions often comes with a unique aesthetic appeal. These materials can offer homeowners and businesses a distinctive look while also serving as a testament to their commitment to sustainability. 8. Boost in Property Value With the growing emphasis on sustainability, properties that feature eco-friendly installations, including green block paving, can witness increased market value. Sustainable homes and commercial spaces are becoming more desirable to environmentally-conscious buyers and renters. Top Eco-friendly Block Paving Materials for 2023 1. Recycled Plastic Pavers Overview: These pavers, constructed from reclaimed plastic waste, are robust, durable, and resistant to cracking or breaking. Benefits: Reduces plastic waste in landfills, requires less energy for production compared to new plastic or concrete, and offers longevity. 2. Porous Concrete Pavers Overview: Unlike traditional concrete, porous concrete allows water to pass through, aiding in stormwater management. Benefits: Mitigates flooding risks, helps replenish groundwater, and offers a robust surface comparable to traditional concrete. 3. Reclaimed Stone Pavers Overview: These are salvaged from old structures, pathways, or quarries and repurposed as pavers. Benefits: Prevents waste, reduces the need for new stone extraction, and offers a rustic, time-worn aesthetic appeal. 4. Grass and Turf Pavers Overview: These pavers are designed with spaces for grass or turf to grow through, creating a blend of hard and soft landscaping. Benefits: Enhances biodiversity, offers natural cooling, and aids in stormwater management. 5. Composite Pavers Overview: Made from a combination of recycled materials such as rubber and plastic, these pavers offer the best of both worlds. Benefits: Durable, versatile in design, and promotes the reuse of potential waste materials. 6. Rammed Earth Pavers Overview: Created by compressing earth, possibly with a small addition of cement, these pavers are natural and have been used in construction for centuries. Benefits: Low carbon footprint, uses locally sourced materials and provides a unique, natural aesthetic. 7. Bamboo Pavers Overview: Bamboo, a rapidly renewable resource, is innovatively used as a material
How to Choose Block Paving Colours?

When it comes to enhancing your Morcambae home’s entrance, the driveway is an emblem of both style and functionality. Often the first visual touchpoint for visitors, it can set the mood for the entire property experience. As a cornerstone of home design, its significance in curb appeal cannot be overstated. The choices you make regarding block paving colours and types in Morcambae can elevate your home from the ordinary to the extraordinary. Every driveway tells a story. It might be of a house that’s stood for decades, its driveway bearing witness to countless memories, now ready for a refreshed look. Or it could be a new canvas, waiting for the stroke of design genius. In either scenario, the diverse block paving options available become crucial. From the timeless elegance evoked by traditional charcoal blocks to the sophisticated intricacy of the herringbone pattern, each selection narrates a unique tale. How to Choose the Colours of Your Block Paving Driveway? Choosing the colours of your block paving driveway requires a combination of aesthetic judgment and practical considerations. Here’s a guide to help you navigate this decision: 1. Consider the Aesthetics of Your Home Existing Colours: Examine the colours of your home’s exterior. The driveway should complement these shades rather than clash with them. Style: If your home has a modern design, sleek greys or monochromatic tones may be best. For a more traditional home, consider warm or rustic tones. 2. Factor in the Surrounding Landscape Garden and Plants: Look at the dominant colours in your garden. A driveway that complements these hues can create a harmonious look. Natural Elements: If you’re near the woods, beach, or other natural settings, consider colours that fit organically with the environment. 3. Think About Maintenance Stain Visibility: Lighter colours might show stains more readily than darker tones. If you’re worried about maintenance, opt for medium to darker shades or speckled patterns that can hide stains. 4. Test Samples Before committing, get a few sample blocks in your chosen colour. Place them in the intended area and observe them at different times of day and under various lighting conditions. 5. Popular Colour Choices Traditional Charcoal: Versatile and often suits various architectural styles.Brindle: A mix of red and charcoal, offering warmth.Buff: Sandy or light brown, which can provide a soft, neutral look.Greys and Silvers: Modern and often used for contemporary designs. 6. Seek Inspiration Look at magazines, online galleries, or neighbourhood homes to see what appeals to you. 7. Practical Considerations Heat Absorption: Darker colours might absorb more heat, which can be a factor if you live in a hot climate. Fade Resistance: Some colours might fade faster under direct sunlight. Look for pavers treated with UV protection. What are the Different Types of Block Paving? 1. Herringbone (45° and 90°) Interlocking V-shaped patterns are arranged either at a 45° or 90° angle to the boundary. It is ideal for driveways as the interlock ensures minimal movement of blocks, resisting vehicular forces. 2. Basketweave Alternating pairs of blocks laid vertically and horizontally. This creates a weave-like pattern reminiscent of woven baskets. Best suited for patios and walkways. 3. Stretcher Bond The simplest pattern involves laying blocks side by side in a linear arrangement, with each row offset by half a block. This pattern mimics traditional brickwork. 4. Stack Bond Blocks are laid directly on top and beside each other, creating neat rows and columns. It provides a contemporary and orderly appearance. 5. Circular/Radial Blocks are laid in a circular pattern emanating from a central point. This design can be a focal point and is often combined with other patterns. 6. Tumbling Blocks are ‘tumbled’ to give them a weathered and aged appearance. It’s not a specific pattern, but rather a treatment that can be applied to blocks in various patterns. 7. Diamond Central diamonds are created using different-coloured blocks and can be combined with other patterns like herringbone or stretcher bonds as a decorative feature. 8. Random Course Different widths of blocks are used in random sequences, offering a less structured, more organic appearance. 9. Interlocking Blocks are shaped, so they interlock with each other, providing high stability. Commonly used in driveways to handle heavy loads. 10. Cobbled Blocks are designed to mimic old-world cobbled streets with rounded tops. Perfect for creating a rustic or vintage look. How To Choose The Pattern For Block Paving? Choosing the right pattern for block paving is essential for the paved area’s functionality and aesthetics. Here’s a guide to help you make the right decision: 1. Assess the Area Larger patterns might be overwhelming in small spaces, while intricate patterns might get lost in expansive areas.Some patterns work better with specific shapes. For instance, circular patterns are ideal for round spaces. 2. Functionality Patterns like herringbone are preferred for driveways due to their interlocking strength against vehicular forces.Some patterns might be easier to repair if individual blocks need replacement. 3. Aesthetic Appeal HMatch the pattern with the architectural style of your home. Modern homes might benefit from a stack bond, while older homes might suit a cobbled look. Some patterns can make a space look wider or longer. For instance, a stretcher bond can elongate an area. 4. Complementary Features If you have existing landscaping or features like a garden, pool, or fountain, consider how the pattern will complement or contrast these elements. 5. Regional Climate In areas prone to heavy rain or snow, opt for patterns that accommodate effective drainage. 6. Personal Preference Always consider what appeals to you personally. It’s your space, and your satisfaction is paramount. 7. Seek Inspiration Look at magazines, local projects, online galleries, or even your neighbourhood to see what patterns appeal to you. 8. Professional Advice Consult with professionals who can provide insights based on their experience. They might also introduce you to newer patterns or combinations. 9. Budget While it’s essential to get a pattern you love, ensure it fits within your budget. Some intricate patterns might require more labor and thus be costlier. 10. Samples
Modern Block Paving Border Ideas in Morecambe

In the scenic backdrop of Morecambe, where the splendour of nature collides with city vibes, Modern Block Paving Border Ideas play a pivotal role in shaping the aesthetics and utility of outdoor spaces. Block paving borders aren’t just about looks; they’re the linchpin that uplifts your property’s visual appeal and value. Whether you’re enhancing the curb appeal of your seaside home or looking to add character to your urban garden, choosing the right border design is essential. These borders define your driveway, pathways, and garden beds and serve practical purposes like weed control and structural support. Find creative block-paving border ideas that suit Morecambe’s diverse landscapes, from coastal retreats to suburban neighbourhoods. What are the Benefits of Block Paving Borders? Block paving borders are more than just decorative elements; they offer a range of practical advantages that can significantly enhance your outdoor spaces. In this section, we’ll delve into the key benefits of incorporating modern block paving borders into your Morecambe property: Enhancing Curb Appeal Block paving borders instantly boosts the visual appeal of your home, making a striking first impression for visitors and passersby in Morecambe’s scenic neighbourhoods. Providing Structural Integrity These borders offer structural support to driveways and pathways, ensuring they remain stable and durable, even in Morecambe’s diverse weather conditions. Weed and Erosion Control Block paving borders act as a natural barrier, preventing the intrusion of weeds into your garden beds and helping to control soil erosion, particularly in coastal areas like Morecambe. Design Flexibility You have the freedom to choose from various materials and patterns to create a design that complements your property’s aesthetic and reflects your personal style. Property Value Well-designed block paving borders can increase the market value of your Morecambe property, making it a more attractive option for potential buyers or renters. Popular Block Paving Border Materials You can choose from the following material for your block paving borders 1. Concrete Concrete block paving borders are known for their affordability and versatility. These precast concrete blocks come in various sizes, shapes, and colours, offering flexibility in design. They are durable and can withstand heavy use, making them a practical choice. 2. Natural Stone Natural stone block paving borders provide a timeless and rustic elegance. Materials such as sandstone, limestone, and granite can add a touch of sophistication to your outdoor space. With their unique textures and colours, natural stone borders seamlessly blend into the natural beauty of Morecambe’s landscapes. 3. Brick Brick block paving borders exude classic charm. Fired clay bricks in different hues offer a traditional and enduring appeal. They are ideal for creating structured, well-defined edges that complement various architectural styles. 4. Granite Granite block paving borders are synonymous with luxury and durability. With polished or flamed finishes, granite lends a touch of luxury to your landscape. Its toughness and resistance to wear make it a superb choice for aesthetic and practical purposes. 7 Best Creative Block Paving Border Ideas Some of the best block paving border design ideas are as follows. 1. Classic Soldier Course The classic soldier course block paving border involves placing bricks or pavers vertically, with their long sides standing upright. This creates a neat and uniform edge along driveways or walkways, resembling a soldier’s formation. Pros Clean Aesthetic: Provides a crisp, clean, and formal appearance that complements various architectural styles.Ease of Installation: Relatively straightforward to install due to its linear design.Sturdy: Offers structural support and helps prevent edge spreading. Cons Lack of Creativity: This may be considered less creative compared to other border patterns.Limited Flexibility: Not as versatile for creating intricate designs. 2. Herringbone Pattern The herringbone pattern involves laying bricks or pavers at a 45-degree angle to create a V-shaped or zigzag pattern. This design is visually striking and provides stability. Pros Aesthetic Appeal: A visually appealing, dynamic pattern that adds interest to driveways or pathways.Excellent Interlock: The interlocking design enhances stability and prevents shifting over time.Distributes Weight: Well-suited for areas with heavy traffic as it evenly distributes weight. Cons Complex Installation: Requires careful attention to detail during installation to maintain the pattern.More Materials Needed: The zigzag layout may require more bricks or pavers than other patterns. 3. Mixed Materials Mixed materials involve combining different types of block paving, such as using bricks for the main pathway and natural stone for the border. This design offers a unique and eclectic look. Pros Customisation: Allows for a personalised design with contrasting materials for added visual interest.Versatility: Combining materials can complement the overall aesthetic of your property.Highlighting Features: Can draw attention to specific areas like flower beds or focal points. Cons Cost: Mixing materials can be more expensive than using a single material.Maintenance: Different materials may require varying levels of maintenance. 4. Curved Borders Curved block paving borders create gentle curves and flowing lines along the edges of driveways, walkways, or garden beds. This design softens the landscape. Pros Natural Flow: Curved borders mimic natural shapes, adding a sense of fluidity and softness to your outdoor space.Visual Interest: They can break up monotonous straight lines and add visual interest.Flexible Design: Provides flexibility in shaping the borders to fit your landscape’s unique contours. Cons Complex Installation: Creating smooth curves may require skilled installation.Potentially Higher Cost: Design complexity can lead to increased installation costs. 5. Geometric Patterns Geometric block paving borders involve the use of various geometric shapes, such as triangles, squares, or hexagons, to create intricate and visually appealing designs. Pros Artistic Expression: Allows for artistic expression and customisation with endless design possibilities.Unique Appeal: Creates a unique and eye-catching border that stands out.Enhances Outdoor Aesthetics: Elevates the overall look of your outdoor space with a touch of creativity. Cons Complexity: Designing and installing intricate geometric patterns can be time-consuming and challenging.Maintenance: It may require extra care to keep the patterns looking their best. 6. Circular Borders Circular modern block paving borders feature curved, circular designs that encircle specific areas, such as flower beds, trees, or outdoor seating areas. Pros Focal Point: This creates a natural focal point